Crafts · DIY

Pincushion Frame

I used to have a little sewing box where I had a pincushion, scissors etc to hand when needed. Time took its toll and I ended up with a drawer of bits and bobs including the pins and needles.IMG_5047

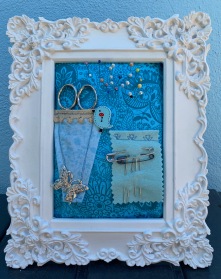
Growing a bit tired of searching for pins, I decided that I needed a pincushion that also holds a scissor etc that looks pretty enough to sit next to the couch in the living room.

As we are still in lockdown (Covid19 for future readers), I had a look through my stash of odd things and found a really pretty photo frame that I must have either bought ages ago or was given as a present (memory is blank on this one). My fabric stash could be the envy of every haberdashery shop so I had no problems putting this frame together. It didn’t even take 30 minutes…. and I think the result looks pretty good.

Lines are not straight (was the first time I used a decorative stitch) but that makes it unique. A little tip, I added the button and butterfly after I already assembled the frame – attach anything you like to add before securing it together. The stuffing was wadding I had leftover from a quilt I made and it worked a treat. No money spent (apart from purchasing everything in the past but that doesn’t count, does it?), assembled quickly and ended up with a pretty frame that looks great in the living room (matches the colour theme in my case).

Enjoy xx

The frame came from Dunnes Stores, the fabric was a special buy from Aldi (part of a fat quarter pack and absolutely no idea where I got the button and butterfly from (a big jar on the shelf).

Crafts · DIY

Seashell Wreath

My lovely friend Agnes went to the beach a few weeks ago (when the weather was still lovely) and collected loads of seashells. Being the awesome friend she is, she brought me a bag full of them – some still attached to both halves.

Saying I was excited is an understatement. I am in the process of creating a little oasis in the back of the house for myself (with lots of help from my amazing husband) and was looking to add a little DIY to the fence above my little herb bed.

A seashell wreath was just the perfect idea. I got the styrofoam ring from Vibes & ScribesIMG_2961 
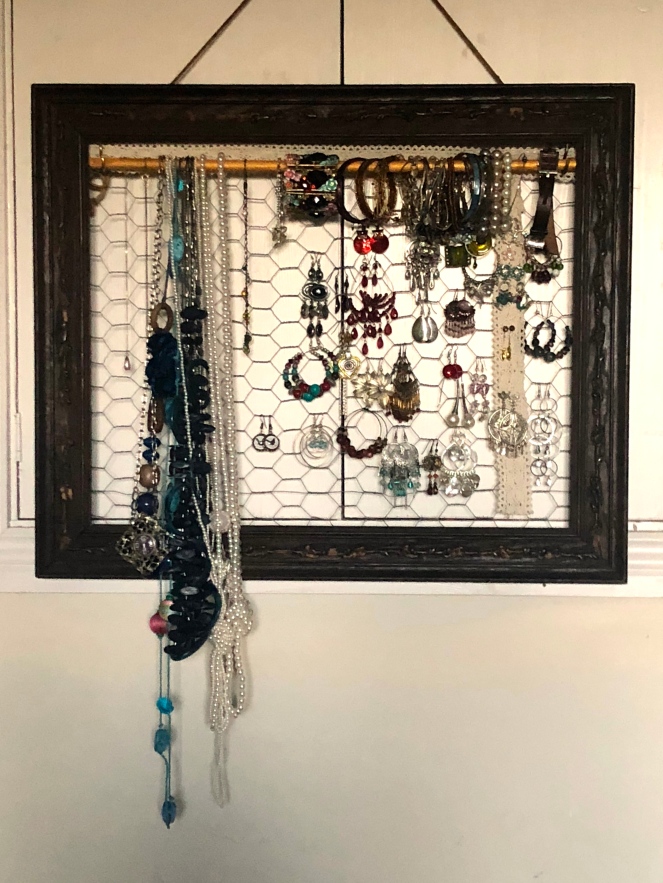
for €1.75 – everything else I had already at home. I have a nice selection of paint samples (when Little Miss Sophie comes over, we do a lot of painting), old jewellery that I was thinking of throwing out and some beads from other projects and broken jewellery. And who hasn’t got a glue gun at home?

I love the result and it looks great on the fence (I just need to hang it a bit higher as my bunting is too high). Here is a little video of the project. Enjoy xx

Disclaimer: There are NO affiliate links in this post.

Christmas

Christmas Glitter Ornaments

Screen Shot 2018-12-14 at 11.33.20Christmas is such a magical time and I love to go to the big department stores like Brown Thomas and Harrods in London. The imagination that goes into the dIMG_E1305ecorations of these trees is simply stunning and I am always jealous when I see how luxurious the trees are.

As I don’t have the budget to buy the larger ornaments, I am always looking for ideas on how to add that vavavoom feel to my own tree.

This year, I came across masks in Mr Price – a great source for craft material – for just €1 each and couldn’t resist buying a few. The shop also has bulk paint and glitter and styrofoam baubles – basically anything I needed for my glitter extravaganza.

The tinsel yarn (that’s what it’s called) I found in Aldi at one of their craft special buys. It came in a pack of four balls (didn’t even need one for five baubles). I crocheted strings of chains to make the yarn a bit bulkier (I am known to have not much patience) and fill the baubles better. PVA glue is a universal glue, also called wood glue. You can buy it in craft shops or DIY stores.

I think my Christmas tree looks quite stunning this year and could stand in Harrods on its own.

Enjoy xxx

Disclaimer: I am not connected with Mr Price or Aldi and have paid for all my material. This is not a sponsored post.

DIY

Jewellery Frame

I am not a jewellery person but you might be forgiven to display some disbelief. I was looking for a certain pair of earrings the other night (one of these rare nights when I was able to persuade Mr Make! to come to a function with me) and opened my little box of treasures. Everything was tangled up and it took me ages to find the matching earrings.

Being fed up with something is the best motivation to change things. And the fact that I remembered that I had some old (and I mean old) frames lying around. I went to an auction once (since then I am not allowed to attend any auctions anymore as I don’t seem to have any self-control) where I saw the old frames offered as a lot and I thought €50 is a bargain (husband didn’t think so).

But said husband comes in quite handy sometimes as his van and shed can be a treasure throve. He happened to have chickenwire and all I needed was a bit of patience.

This is my first jewellery frame and I have learned a lot from it (in case I get another notion). First, I would have added all frills before I attached the chickenwire – makes life so much easier.

Anyways, here is te result (and I noticed that I have much more jewellery than I thought I had (and a lot has already been sorted out and brought to the charity shop). It is all costume jewellery and things I found at craft markets etc.

When I took the frame and turned it around (I haven’t touched the box of frames since I bought it) and found this amazing label – I made sure that I didn’t take it off when I cleaned the frame. I tried to do a quick research into the business but came up empty – might do it more seriously later.

IMG_1107

I could have painted the frame but I love wood as it is (saying that, some upcycle I have seen were awesome) and I wanted to preserve the details on the frame. They were quite loose in some places and completely missing in others. I carefully glued the pieces back into their rightful place and cleaned carefully. I haven’t waxed it yet but it’s in the planning.

IMG_1108

Next, I stapled the chickenwire to the back of the frame – and here is the mistake, I should have added the wire last after I added the rod for the bracelets and the cotton lace for the stud earrings (also, I will be adding a second rod in a few days for the rings).

I am not showing you the back of the frame with my sorrow attempt to staple – I have an electric stapler but for some reason it decided not to cooperate and the staples were half hanging out so I had to hammer them down.

IMG_1109

Next I attached the cotton lace on top of the frame (again, I should have started with the rod). After I attached the rod (with two srew-in hooks), I didn’t have enough space on the top, so I attached a second ribbon of cotton lace.

IMG_1110

Now it was just a matter of sorting through my assortment of jewellery (and I should really stop calling it jewellery as it has no financial value whatsoever).

IMG_1113

Enjoy xx

DIY · Uncategorized

Command Centre


A lot of my work is done at home – I write a lot for the local newspaper, my food blog and some of the clients I have. I have a lovely office and I have my diary (a real one as I don’t like online/computer calendars – it’s a personal thing). Very often, I get a phone call asking me if I would be free to attend this or that event or would I be free to MC an event. I then have to look for my diary, flip the pages quickly to see if I have any commitment on that day.

After a while, I grew tired of this and I considered ways of making access to this type of information more accessible. Looking through Pinterest (and losing hours over this), I found several ideas of so-called Command Centres. This is what I needed. As my desk is towards a wall and I have a shelving unit on the other wall, I wasn’t able to just screw something to the wall so needed to think outside the box. And here is what I came up with – rather than having individual items on a wall, I decided to create a board on which everything is placed, hanging on a rail on my shelving unit so that I can move the command centre along the shelf when I needed something from behind. All the measurements below are based on my needs – you might need different ones.

Command Centre

You need:

  • 1 sheet plywood 1cm thick measuring 50cm x 70cm
  • Sanding paper, different grade from rough to fine
  • Satinwood paint black (you don’t need much)
  • A brush
  • A blackboard measuring 21cm x 29cm (got it from a discount store and painted the frame in copper-gold)
  • A pinboard measuring 24.5cm x 24.5cm (also from a discount store)
  • A pad of monthly planner measuring A4 size (I got mine from Sostrene Grene in Cork)
  • A strip of magnet
  • 3 magnets
  • 3 pegs (I got mine in Tiger Store in Cork)
  • 2 hook screws
  • nails
  • hammer
  • 1 rail measuring longer than your board with hanging hooks (I got mine from Ikea)

I took the sheet of plywood and drilled a hole on either side of the top sheet large enough so that the hooks from the rail fit through and sanded it down with a rough sanding paper first before using the fine grade one. I didn’t need it to be perfectly smooth. I then painted it with black satinwood paint (I added two coats to make sure it was all nicely covered), covering also the sides.


Measuring the items that needed to go on the board, I nailed the balckboard directly onto the black plywood. Next to it, I added the pinboard (I drilled a hole in the middle and used a hookscrew to fix the board to the plywood.

I then drilled a hole on either side of the planner pad, large enough to hang on the hookscrew. I held the pad in position on the board, marked the holes and srew in a hookscrew so that I was able to hang the planner pad in position.

I then added three pegs (I used first doublesided tape but that didn’t last long after I added a photo to the pegs, so used hot glue in the end) and glued the magnet strip and added the three magnets.

I had a craft magazine that had pop-out bunting (it’s a few years old actually), so I used the triangles to complete the bunting and hung in on top of the command centre.

And et voila, when someone calls now, I just have to turn around to check if I am free on a certain day. I use the blackboard to keep track of my projects and the pinboard for anything that might float around the desk otherwise.